On-Board Air Tank and Compressor ...
The installation of the on-board compressor and air tank is FINALLY finished. Too drawn out of a project. I've also gotten my ARB locking differential installed since this was originally written. Even though the air tank/compressor and locking differential basically go together I'm putting the ARB air line and wiring information into a seperate document.
Parts ...
- Quick-Air I compressor
- Sun Performance 6"x24" 2.5 gallon air tank
- Air tank install kit from Sun Performance
- A BUNCH of misc fittings
- One three outlet air manifold
- A LOT of Teflon tape:-)
- Various electrical connectors and some liquid electrical tape
- 1/8 steel plate for tank mounting bracket
- 1/4 steel plate for compressor mounting bracket
- 4 spare vibration damping mounts from one of my MSD 6AL ignitions
- Short piece of 1.5" wide stainless steel sheet metal for bracket to hold main tank line off K&N air filter
- Swivel quick-disconnect for the air hose
- 25' air hose and locking air chuck
- KC Highlight light mounting kit - for no other reason then to get the horizontal mounting switch and the 40 Amp relay
- 20,000 zip-ties
Installation ...
Step 1
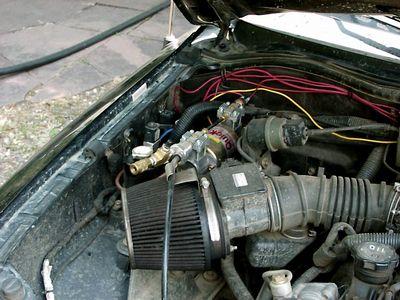
Find mounting space for air compressor. I don't have ABS so behind the power-steering tank it went. Fabricate a mounting bracket. For the mounting bracket I used the 1/4" mild steel plate. Here is where I used the MSD mounting bushings. The Quick-Air vibrates and those bushings make a sizeable difference! Mount the bushings to the bracket and the compressor to bushings. If you use the quick-air make sure that you mount it far enough away from the firewall so that the on/off pressure switch can be mounted. I put the pressure switch in the other outlet on the compressor and it sticks out towards the firewall. Tack weld the bracket in place. Remove compressor and finish welding the bracket in.
Step 2
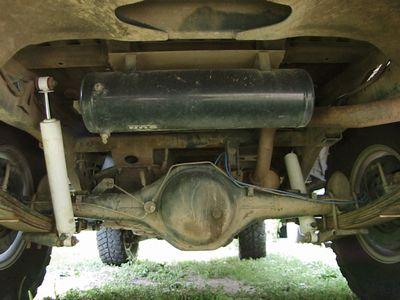
Find mounting space for air tank. Hah! GOOD LUCK! Do you know how BIG 6"x24" is??? Ok. Finally settle on mounting it behind and above the rear axle - cab forward of where the spare would mount without the rear carrier. And when I say behind the axle I mean RIGHT BEHIND.
I did not want to run the risk of a rock comming up from underneath and hitting the tank. Now the only way it can hit the tank is if something takes the axle out of the truck first. I may still fabricate a skid plate for it even so. Yes, I am paranoid. Cut a piece of plate steel out to fit from the outer edge of the front-to-rear running rail on the body on one side to the other rail on the other side - about 20" or so. Mark the holes from the tank mounts on the plate and drill. Prep, paint and undercoat the plate except for where you need to weld. Mig/Tig/stick weld the plate to the body. Prep, paint and undercoat the welded area to prevent rust.
Step 3
It gets easier here.:-) There are 5 outlets on the tank. You need one for the drain and one for the inlet line. As the exhaust comes out on the passenger side you should turn the tank so that the four outlets are on the driver side. Plug everything except the end one on the driver side - that's the inlet - and the bottom one on the driver side - that's the drain. Now you need an elbow for the inlet. I reversed the fittings from the Sun diagram. Used the one that goes on the compressor for the tank and visa versa. Attach the hose fitting to the elbow and screw the elbow into the tank pointing the line towards the front of the truck. Now you're ready to bolt the tank into the truck. Short open end wrench really helps here!
Step 4
Now, back to the compressor. Install the shut-off switch per Sun directions. WARNING: When installing anything into either port on the Quick Air I be EXTREMELY careful! Over-tightening will certainly crack the top compressor housing!
Install three outlet air manifold on compressor outlet. I needed an adapter sleeve to go from 3/8-1/4. Install fitting for line to tank on manifold - this is the one I just mentioned swapping in step three. Install quick-disconnect for air hose in another outlet on the manifold. Note: Originally I'd planned to install the air guage into the third hole but that ended up being where I installed the solenoid for the ARB Air-Locker. Install guage air line fitting in third and remaining hole in manifold. Keep number of adapter fittings to a minimum as you'll not have a lot of room due to the air filter and power steering tank. Fit compressor onto bracket in truck and adjust manifold to clear tank and air filter. Looking from the front of the truck to the back - disconnect on left, air tank line on right and guage line on bottom - Y configuration. Mount compressor.
Step 5
Electrical. Follow the installation directions supplied with the compressor making SURE you use at least 12 guage wire for the compressor! I installed the 40 amp relay from the KC light install kit between the battery and compressor. I ran wire to both the positive and negative poles. I didn't ground to the body. I took the KC switch, a dremmel and the blank insert from the hole to the right of the steering column and ground until the KC switch fit inside the blank. Then I put both back into the hole on the dash. Can't see it most of the time and a casual glance looks like stock. Easy to reach. Too cool! I wired the compressor to stay on even if the vehicle is off - for obvious reasons - but small changes in the diagram could fix that if you didn't want it that way.
Step 6
Mount the gauge. For this step, I'm afraid you're on your own. Follow the directions from the Sun install kit. Drilling holes in the dash is your business and I make no recommendations there. My plan is to eventually install the guage where the console CD player currently sits. To date, I still haven't installed the guage. Not a high priority.
Step 7
Run the air line from engine compartment to the air tank. This should not take more then thirty minutes! Including the time to fabricate the hold-off bracket for the air filter if needed. Start at the engine by inserting the line into the fitting on the manifold and work towards the back of the truck. Just follow the fuel lines. Keep the air line AWAY from the exhaust and the passenger side rear shock. Loop around the top --LOOSELY-- and along the top crossmember and then to the tank. DO NOT Zip-Tie the line in until you have it completely run. You'll most likely need to do adjustments. After you are sure you have it right start Zip-Tieing the line - I used the fuel lines - loosely all the way to the back. I did one about every foot and a half. Make sure the line is adjusted ok then tighten the ties from the front to the back. Measure the line to the tank and trim. Make sure the end is SQUARE!!! A razor knife works well. Insert line end into the tank fitting.
Step 8
Assemble the air hose using the remaining end of the quick disconnect and locking chuck.
Step 9
Time to test. Fire up the compressor. Get some dish soap and mix it in a bowl of water. Check connections by spraying, brushing or dribbling - my technique:-) - the solution on the connections. Reseal if necessary. The only leaks I had were at the line to tank fitting because the line was not cut square and a leak on one of the manifold fittings. Both fixed and a couple minutes.
All done.
Review ...
The performance of the Quick Air I is good for the price. I've been very happy with mine. It typically takes about five to six minutes to air up each of my 33"x12.5" Yokohama Geolander M/Ts from 15 to 32psi. This is at 9-12,000 feet usually so I consider this very good! The one thing that I really noticed was the improvement in the compressor's performance with the air tank installed. Previously it was taking 6-7 minutes.

