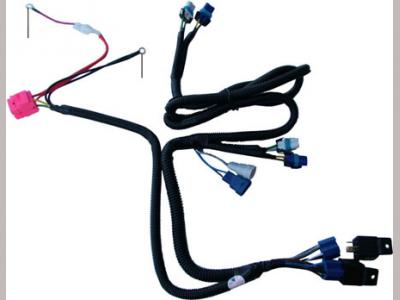
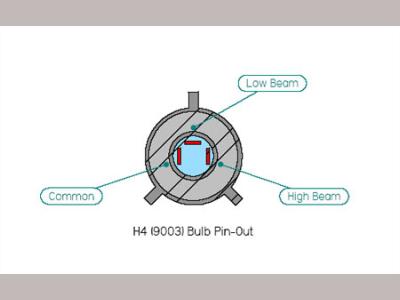
SUV Lights HD Headlight Relay Harness ...
In my never ending quest to track down a pesky, intermittent short I decided it was time to look at the headlight harness. I've always run the 80/100W H4s off the stock Mitsubishi harness which isn't the best idea in the world. Two 80/100 watt bulbs pull around 15 amps - about 6 amps more than stock 55/60 watt bulbs.
In 10 years I've gone through one set of H4 plugs - melted the stock ones a few years ago wheeling in 105+ temps. I've also noticed that over the last several years the light output isn't quite what it used to be. Partially that's due to the headlight housings themselves. After almost 500,000 miles the lenses are starting to get pretty cloudy. Simple enough. I figured I'd wire up a new harness and be good to go.
That idea died a pretty quick death. I'm still working on the new harness for my ARB lockers and compressor. Not a difficult project but it is time consuming and the cost of all the little parts adds up quickly. The parts cost isn't all that high, but I don't have the time for another 2-3 week project. Still, I figured I'd do some more research and see what I came up with. After some digging in the Montero and Montero Sport wiring diagrams and doing some web surfing I figured out that, like Toyota and most other Asian vehicles, the Montero and Montero Sport use a ground switch configuration rather than a power switch configuration like most pre-2000 American vehicles. Hmmm, interesting. Well, there are still wiring diagrams out there for that type of harness. So, still not a huge issue. A few hours later after costing out the parts I decided this was not going to be particularly cheap. 'Cheap' is relative, of course. $50 for all the wiring and do-dads isn't exactly life threatening.
While surfing for parts, however, I ran across pre-built, heavy duty relay type harnesses; some of which are built for the ground switch type setup. Cost on these were running between $20-$150. I found several well designed and well built harnesses in the $30-$70 range. The price primarily depending on what wattage bulbs the harness could handle.
I finally settled on the following harness from SUV Lights for $73: "Toyota H4/9003 bulb size: Tacoma, Tundra, Sequoia, Sienna, T100 etc Heavy Duty Headlight Wiring Harness" The harness showed up surprisingly fast, intact and with all the appropriate pieces. I have absolutely no problems with their shipping department. They were great!
After reading several posts on the installation time of various manufacture's harnesses I was very interested in seeing how quickly this would go. Keep in mind that this harness isn't for a Montero or Montero Sport, it's for a Toyota. You never know if there's some weird difference waiting in the wings to bite you in the butt. This time, however, everything went smoothly. Installation time from start to finish was just about 45 minutes and required nothing more than VERY basic hand tools and a package of zip ties.
Installation ...
- Make sure your headlights are turned off
- Unplug the original headlight plugs from the bulbs
- Lay the harness out in the direction you plan to install it
- Figure out where you're going to mount the two relays
- Install the harness, zip tying it into place
- Attach the positive wire of the new harness to the battery
- Attach the negative wire of the new harness to a GOOD, CLEAN ground on the chassis or directly to the battery
- Plug the two female H4 plugs on the new harness into the headlights
- Plug the third male H4 plug from the new harness into the closest female H4 plug on the factory harness
- Plug the two supplied relays into the new harness and mount the relays
- Double check everything and then test the headlights
- Zip tie the unused remaining female H4 plug out of the way (its also a good idea to cover it with something non-conductive and non-flammable to keep crud from accumulating in the plug)
Overall, this was a very simple, short installation. Some notes and things to think about ...
- Taking into consideration the amount of amperage that 100+ watt lights pull, upgrading or adding secondary battery cables of no less than 4 gauge is something to seriously consider. A pair of 150 watt off road lights combined with a pair of 100 watt head lights will pull around 38 amps. If you combine that with the power drawn to run the rest of the vehicle you'll be skirting the hairy edge of the stock charging circuit wiring. At the very least installing secondary 4 gauge cables directly from the alternator to the battery gives the electricity a direct, ultra low resistance path directly from the alternator to the battery. Electricity takes the path of least resistance so the battery will draw across the new cables rather than across the stock, much smaller gauge charging circuit.
- Given the above amperage draws, keep in mind an appropriate battery and possibly an alternator upgrade might be required at some point. The stock alternator on the Montero Sport is only rated at 85 amps. A pair of 150 watt IPF off-road lights and a pair of 100 watt headlights combined with, say, running the front and rear cab heaters at 3/4 speed while 'wheeling for six or seven hours will eventually drain the battery. This is also not good for your alternator. Alternators are not battery chargers; treating one like a shop battery charger will decrease the life span of the alternator.
- There are two ways to connect a 'add-on' harness like this ...
- You can connect the new harness +/- leads directly to the battery (or battery/chassis) which is the typical, most direct way. This works great if you have the room to mount the relays and tuck in the new harness. This also keeps the total length of wiring from the bulbs to the battery to a bare minimum.
- The second way effectively reverses the mounting direction. The positive lead is connected to the positive post on the alternator and the negative lead is connect to the chassis. Personally I don't recommend the second option unless you have either replaced the battery cables with or have installed secondary 4 gauge or larger +/- battery cables running directly from the alternator to the battery. Removing the electrical load from the stock vehicle wiring is the primary point of this install. If heavier or secondary cables are not installed, while the engine is off and the ignition is turned on, the headlights will draw power 'backwards' across the factory charging harness from the battery.
- The harness can be grounded either directly to the negative post of the battery or to a suitable ground point on the chassis. The first option is always my choice. Grounding to the chassis introduces points of failure I'd rather not deal with. It assumes that the ground path is good all the way to the battery. The older a vehicle gets the less likely that assumption is to be correct. Rust, corrosion, dirt and other crud degrade connections. Even something as simple as a mechanic forgetting to replace a ground strap after vehicle maintenance can cause unexpected problems. Personally, I prefer not to have my headlights blink off in the middle of nowhere doing 80 MPH down the highway.
- SUV Lights' harness has a fuseable link at the end of the positive. The link then connects to the battery with a large ring terminal. It wasn't apparent to me that it was a fuseable link and it looked a bit strange going from what appeared to be 18/16 gauge wire to 12 gauge wire for the rest of the harness. A quick exchange of emails with SUV Lights cleared this up. According to them, this is a slow reacting fuseable link and technically isn't required since it's promptly followed by two fast blade fuses. I saw no reason to change it so I installed everything as it came to me.
- The negative ring terminal is smaller than the positive ring terminal. This is probably okay for the majority of factory equipped vehicles. Unfortunately my battery, cables and terminals are anything but factory. The positive ring terminal was perfect but the negative ring terminal was too small. Having a selection of ring terminals handy would not be a bad idea.
- The harness comes with two relays. One for low beams and one for high beams. They're identical relays and are reasonably available on the Internet but that doesn't mean they'll be available in any little town you happen to drive through on vacation. Like packing spare headlight bulbs its a good idea to have a spare relay.
- I've been using the Wagner 80/100W (Napa PN# BP1210/H4) halogen bulbs since I bought my '97 Sport without any ill effects to the headlamp housings. This is after almost 500,000 miles with lots of 'wheeling at night both in Colorado and Utah in the summer when temperatures really get up there in the engine bay. However, the 1997-1999 headlamp housing has a glass lens with a plastic housing. The 2000-2005 Montero Sport headlamp housing is all plastic - including the lens. It has been strongly suggested several times over the years by the Mitsu techs I deal with that the high wattage halogen bulbs not be used because the housing can not withstand the heat generated by the bulb. After taking a good look at the housings on my new 2003 I agree with them.
Review ...
So, what do I think so far? So far, everything is great! My head lights are brighter. That was apparent immediately even when testing in the middle of the afternoon in broad daylight. Its pretty obvious there's a lot more resistance in the stock harness than there is in the new one. There's enough slack to route everything pretty much anywhere you could think of that's practical and it appears to be well assembled. Overall, I really liked the quality of the harness. We'll see how it's doing in a year but honestly, there's just not too much involved with a headlight harness. I expect this is one part that will probably last the life of the vehicle.

