Problem Parts ...
Below is a list and some pictures of "problem parts" to keep an eye on. I have to give Mitsubishi credit for the list being so small. Overall I've had very little trouble with any part of my LS even considering the abuse this poor vehicle has been subject to.
Parts list ...
- Transmission roll stop
- Manual transmission mount
- Transmission and transfar case shifter boots
- Front and rear transfer case yokes
- Transfer case shifter piviot bushing
- Clutch fork boot
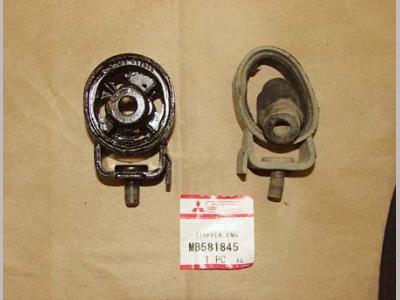
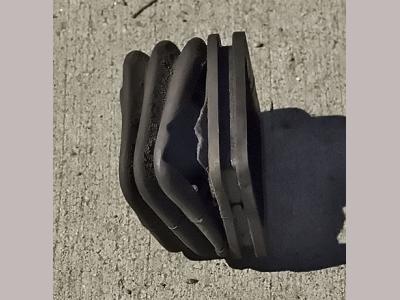
![]() This is the "transmission roll stop" for the 5-speed manual transmission. You probably won't have to work too hard to figure out which is the new one and which is the old one.:-) The worn out roll stop is only about two years old but sorely in need of replacement. Worn roll stops allow excessive movement of the transmission and transfer case which can damage other things. Worn roll stops will also result in excess noise and vibration being transmitted into the cab. This part is attached to the driver side frame rail under the vehicle by a single bolt. The transfer case is then attached by a bracket and bolt to the roll stop.
This is the "transmission roll stop" for the 5-speed manual transmission. You probably won't have to work too hard to figure out which is the new one and which is the old one.:-) The worn out roll stop is only about two years old but sorely in need of replacement. Worn roll stops allow excessive movement of the transmission and transfer case which can damage other things. Worn roll stops will also result in excess noise and vibration being transmitted into the cab. This part is attached to the driver side frame rail under the vehicle by a single bolt. The transfer case is then attached by a bracket and bolt to the roll stop.
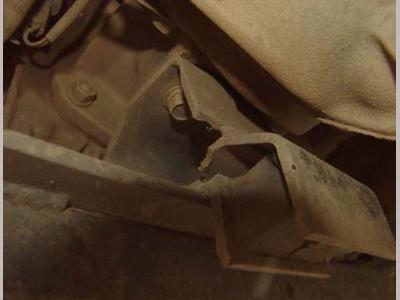
![]() This is an - admitedly - poor picture of the 5-speed manual transmission mount. This IS a stock Mitsubishi transmission mount but the transmission cross brace is NOT STOCK. In this picture you can see the rubber "bushing" sandwiched inside the upside down U of the metal plates of the transmission mount. (right of center in picture) There are two "bushings" - one front of the cross member and one rear. The rubber will seperate from the metal allowing the transmission to "sag" down and allow excessive transmission and transfer case movement. The first part to go after the transmission mount is the roll stop mentioned above. Same as the roll stop, this will cause excessive noise and vibration to be transmitted to the cab.
This is an - admitedly - poor picture of the 5-speed manual transmission mount. This IS a stock Mitsubishi transmission mount but the transmission cross brace is NOT STOCK. In this picture you can see the rubber "bushing" sandwiched inside the upside down U of the metal plates of the transmission mount. (right of center in picture) There are two "bushings" - one front of the cross member and one rear. The rubber will seperate from the metal allowing the transmission to "sag" down and allow excessive transmission and transfer case movement. The first part to go after the transmission mount is the roll stop mentioned above. Same as the roll stop, this will cause excessive noise and vibration to be transmitted to the cab.
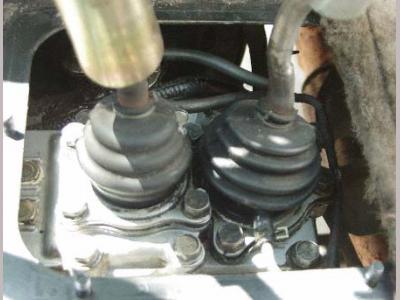
![]() The picture to the right shows an in-cab view of the transmission (left) and transfer case (right) shift levers mounted on top of the transfer case. Note: the large rubber shifter assembly boot that bolts to the floor pan using the bolts seen around the bottom and left edge of the picture has been removed to allow a clear photograph of the assembly. Exposed to road salts, de-icers, a good deal of heat and almost constant flexing from shifting over time these two rubber boots are prone to splitting and leaking. The two rubber boots are all that keep contaminants - i.e. dirt, water, sand, road salt, de-icer, etc. - from leaking down inside the transfer case. After 60,000 miles these boots should be checked for wear at least once a year (the older the boots the more frequent the checks) and replaced immediately if more then surface cracking of the rubber is noticed. Replacement of a failed transfer case can cost upwards of $3500 so this falls into the 'not just a cosmetic thing' category!
The picture to the right shows an in-cab view of the transmission (left) and transfer case (right) shift levers mounted on top of the transfer case. Note: the large rubber shifter assembly boot that bolts to the floor pan using the bolts seen around the bottom and left edge of the picture has been removed to allow a clear photograph of the assembly. Exposed to road salts, de-icers, a good deal of heat and almost constant flexing from shifting over time these two rubber boots are prone to splitting and leaking. The two rubber boots are all that keep contaminants - i.e. dirt, water, sand, road salt, de-icer, etc. - from leaking down inside the transfer case. After 60,000 miles these boots should be checked for wear at least once a year (the older the boots the more frequent the checks) and replaced immediately if more then surface cracking of the rubber is noticed. Replacement of a failed transfer case can cost upwards of $3500 so this falls into the 'not just a cosmetic thing' category!
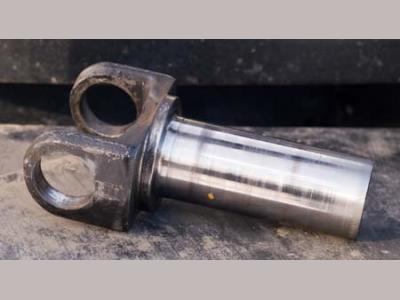
![]() The picture to the left shows the rear driveshaft transfer case yoke. Under normal driving - read street use - the slip yokes for the front and rear drive shafts can last for decades. Big tires, lower transfer case gearing, and the general abuse of off-roading takes it's toll. Do NOT overlook this part when doing general maintenance! If a yoke grenades it is likely it will destroy the transfer case. A new transfer case from Mitsubishi is currently around $3000.
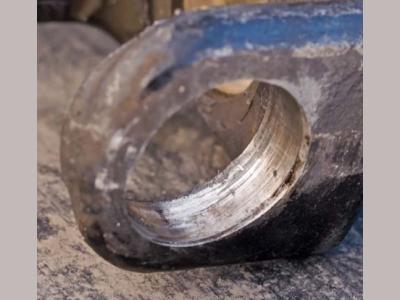
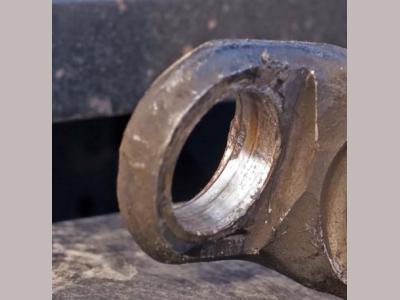
If you look closely at the next two pictures you can see heat discoloration and galling where the u-joint cups normally sit as well as damage to the inside lips of the cup area. In technical terms this is known as 'a really bad thing'. This damage is due to the metal surounding the u-joint caps streching. The expansion allows the cups to move inside the yoke. It also puts uneven pressure on the cups causing them to break. In the case of the yoke shown in the picture eventually one of two things would have happened: The yoke itself would have failed due to fatigue or the u-joint caps would have failed destroying the yoke.
This yoke had another problem as well. The slip part of the yoke that slides over the output shaft was staring to wear and expand. Although nothing is evident from looking at the yoke and it appeared to be suitably snug on the output shaft nonetheless, it was getting loose enought to cause a rather severe vibration and a driveline noise that sounded very much like a bad pinion bearing. Upon replacement of the yoke ($45) both noise and vibration completely disappeared. The transfer case slip yokes should be examined at least once a year. A good time to do this is when the u-joints get greased. U-joint cups MUST be pressed into the yoke with either a shop press or a VERY large vise. If you can press the caps in by hand then it is well past time to replace the yoke! Examine the slip area for hairline cracks, any binding with the output shaft (usually caused by twist in the shaft or yoke) and any abnormal play between the yoke and output shaft. I HIGHLY recommend that the rear yoke be replaced every couple of years along with the u-joint if the vehicle is modified (bigger tires, etc.) and used off road more than 9-10 trips/500+ miles a year. The front yoke typically doesn't see as much use so double the rear should be fine. Keep in mine that level of abuse, level of modification, terrain, 5-speed/automatic, driveline angles and other factors need to be taken into account.
The picture to the left shows the rear driveshaft transfer case yoke. Under normal driving - read street use - the slip yokes for the front and rear drive shafts can last for decades. Big tires, lower transfer case gearing, and the general abuse of off-roading takes it's toll. Do NOT overlook this part when doing general maintenance! If a yoke grenades it is likely it will destroy the transfer case. A new transfer case from Mitsubishi is currently around $3000.
If you look closely at the next two pictures you can see heat discoloration and galling where the u-joint cups normally sit as well as damage to the inside lips of the cup area. In technical terms this is known as 'a really bad thing'. This damage is due to the metal surounding the u-joint caps streching. The expansion allows the cups to move inside the yoke. It also puts uneven pressure on the cups causing them to break. In the case of the yoke shown in the picture eventually one of two things would have happened: The yoke itself would have failed due to fatigue or the u-joint caps would have failed destroying the yoke.
This yoke had another problem as well. The slip part of the yoke that slides over the output shaft was staring to wear and expand. Although nothing is evident from looking at the yoke and it appeared to be suitably snug on the output shaft nonetheless, it was getting loose enought to cause a rather severe vibration and a driveline noise that sounded very much like a bad pinion bearing. Upon replacement of the yoke ($45) both noise and vibration completely disappeared. The transfer case slip yokes should be examined at least once a year. A good time to do this is when the u-joints get greased. U-joint cups MUST be pressed into the yoke with either a shop press or a VERY large vise. If you can press the caps in by hand then it is well past time to replace the yoke! Examine the slip area for hairline cracks, any binding with the output shaft (usually caused by twist in the shaft or yoke) and any abnormal play between the yoke and output shaft. I HIGHLY recommend that the rear yoke be replaced every couple of years along with the u-joint if the vehicle is modified (bigger tires, etc.) and used off road more than 9-10 trips/500+ miles a year. The front yoke typically doesn't see as much use so double the rear should be fine. Keep in mine that level of abuse, level of modification, terrain, 5-speed/automatic, driveline angles and other factors need to be taken into account.
Just a quick update: While attempting to track down a persistent vibration problem that resurfaced recently I found out that the yoke issue noted above extended to include the driveshaft end of the yoke assembly as well. One u-joint cap appears to be snug but the other is not. The u-joint caps must be pressed into the driveshaft with a press; if there is any play or the caps can be pressed in by hand the assembly must be replaced.
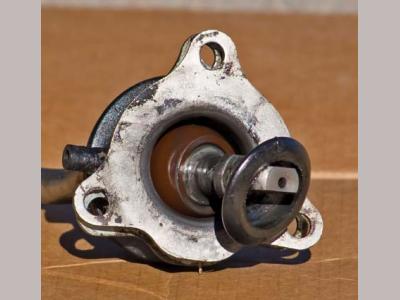
![]() To the left is a picture of the transfer case shifter and the brownish bushing that seems to have a tendency to fail. So far I've had to replace this three times and unfortunately that requires replacing the entire shifter assembly. For some reason the bushing eventually disintegrates and the pieces end up droping into the transfer case.
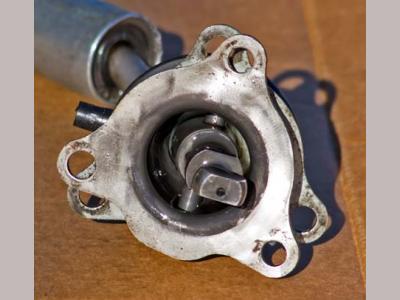
To the right you can see what's left after the bushing falls out. Thankfully, this is not an overwhelmingly expensive part to replace. Unfortunately, if it fails on the trail it makes shifting the t-case from very difficult to virtually impossible. This isn't a big issue, of course, if you're just on a day trip but it certinly can screw up a two week vacation to Moab in short order. I've gotten into the habit of checking this about every three or four trips and once a year when I do spring maintenance. Remove the shifter and check for cracks in the bushing. Since the bushing has the consistency of Bakelite the cracks are pretty easy to see; generally appearing as black hair lines in the bushing. Obviously, if there are any peices missing it's replacement time.
To the left is a picture of the transfer case shifter and the brownish bushing that seems to have a tendency to fail. So far I've had to replace this three times and unfortunately that requires replacing the entire shifter assembly. For some reason the bushing eventually disintegrates and the pieces end up droping into the transfer case.
To the right you can see what's left after the bushing falls out. Thankfully, this is not an overwhelmingly expensive part to replace. Unfortunately, if it fails on the trail it makes shifting the t-case from very difficult to virtually impossible. This isn't a big issue, of course, if you're just on a day trip but it certinly can screw up a two week vacation to Moab in short order. I've gotten into the habit of checking this about every three or four trips and once a year when I do spring maintenance. Remove the shifter and check for cracks in the bushing. Since the bushing has the consistency of Bakelite the cracks are pretty easy to see; generally appearing as black hair lines in the bushing. Obviously, if there are any peices missing it's replacement time.
![]() To the right is a picture of the clutch fork boot. After around 100,000 miles this boot starts to disintegrate and allow grit, water and crud into the bell housing. All this crud will do nothing good to the clutch. Check this boot on a regular basis. Every six months or whenever the oil is changed and replace it immediately if the boot is torn. This is also a good time to check the clutch slave cylinder for leakage. Pop the rubber boot off the slave cylinder and see if fluid dribbles out.
To the right is a picture of the clutch fork boot. After around 100,000 miles this boot starts to disintegrate and allow grit, water and crud into the bell housing. All this crud will do nothing good to the clutch. Check this boot on a regular basis. Every six months or whenever the oil is changed and replace it immediately if the boot is torn. This is also a good time to check the clutch slave cylinder for leakage. Pop the rubber boot off the slave cylinder and see if fluid dribbles out.
